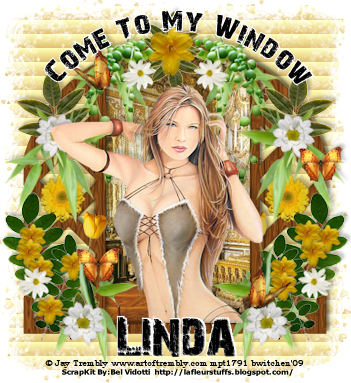
This tut was created on 2-10-09
Any similarities are purely coincidental.
I use PSP version 12.01 this tut can be done in any version.
I rate this tut as EASY. A good tut for beginners.
The tube is created by : Jay Trembly
www.artoftrembly.com
and is used with a license which I purchased from
www.mypsptubes.com
This artist however has since moved and you may now find his tubes at
www.cilm.com
Supplies:
Sunny Day Scrap Kit from Bel Vidotti
http://lafleurstuffs.blogspot.com/
(to find this in the top left of the blog type Sunny Day in the search box)
My Supplies: >HERE<
Included in my supplies:
Window Tube/Window Tube textured (created by me)
Font: 28 Days Later from http:\\www.DaFont.com
Not Included: Mask Of Choice & Picture Of Choice
~~~~~~~~~~~~~~~~~~~~~~~~~
Ok here we go:
Open all supplies in PSP.
Open a new image 450 x 450
Copy and paste the window image of your choice.
(if you are using the template, add texture by going to:
effects>texture effects> sculpture and choose one from your files)
Placing your choice of picture inside of the window area:
Copy your choice of picture & pasted it in a new layer under the window. Move it around until you are satisfied with where it is set. Next, click inside window layer using your magic wand. Go to Selections>Modify>Expand> by 2. Now go back to the room layer and choose Selections>Invert, next chose Edit>cut.
Placing the girl inside the window:
Copy and paste your tube above the window. Add a drop shadow. Choose the window again, then using your magic wand again click inside the window, go to Selections>Modify>Expand>by 1
Click back to your girl and choose Selections>Invert then erase those parts of the tube you do not want hanging outside your window.
Merge the three layers, and add a drop shadow of choice.
Now your bedroom and girl are inside of the window.
Adding your vegetation:
Open your Bel Vidotti Sunny Day Scrap Kit.
There is no rhyme or reason to this, feel free to to place leaves and flowers as you wish.
I only added drop shadows to the flowers and butterflies to make them stand out a little, you can add them however you wish too.
Next merge all visible layers.
Adding your Background Mask:
Now that all other layers are merged. Add another layer, drag it below your window, and fill it in with white. Now go to Effects>Texture Effects> Sculpture> and choose how the outside of your house will look. Then go to Effects>Texture Effects> Blinds this will create siding for your home. Using which ever settings you feel are appropriate. Now choose a mask from your own supplies, and apply it to this layer, and merge group.
Add your copyright & name. Finish by merging visible and save as a PNG.
As you notice, i did not merve all & flatten, when you do you will have a background. I choose PNG so that i do not have one, and the tag can change depending on the background color of the page you place it on.
Congratulations... you can now Come To My Window!








No comments:
Post a Comment