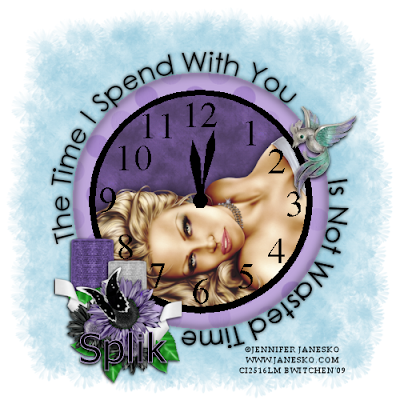
This tutorial was created by Bwitchen on Feb. 20,2009
any similarities to any other tut is completely coincidental.
I use PSP version 12.01 this tut can be done in any version.
I rate this tut as EASY. A good tut for beginners.
Tag Info:
©Jennifer Janesko www.janesko.com
used with license from
www.cilm.com
Supplies:
Bwitchen_WastedTime_Supplies by me
includes candles, bird, flowerspray, clock face template, clock numbers
Bwitchen_WastedTimeWordart By me
Not supplied: Pattern of choice
Mask Of Choice
Zip File > HERE <
1.Open all supplies in PSP.
2.Open a new image 400 x 400 raster with transparent checked.
3. Copy and paste the solid circle
4. Duplicate this once and hide the bottom copy.
5. Go to effects>texture effects> sculpture and choose a background for your clock face.
6. Copy & paste your clocks numbers.
7. Now choose the tube you want inside of the clocks face and paste it just above your sculptured layered.
8. Add a drop shadow to your tube.
9. Click on your hidden copy of the gray circle with your magic want ( if any parts are outside of the clock)
10. reclick the layer with your tube & choose selections> invert. Then edit>cut
11. Merge Visible.
12. Go to your hidden gray circle, and unhide.
13. Click on this layer & resize it 118 percent.This is the outside of the clock.
14. Go to effects>texture effects> sculpture.
15. with your magic wand, click on the outside of this layer, and choose selections>invert
16. Next go to selections> modify feather by 8.
17. Go to selections> contract by 4.
18. Go to selections> invert.
19. with this layer still selected & inverted, go to effects>3-d effects dropshadow of vertical 0, horizontal 0, opacity 100, blur 10.
20. repeat step 19 for a more dramatic effect.
21. Now add your accessories: the bird, the flowers, the candle(s). Be sure to add a flame to your candle if desired.
22. Add a drop shadow to each of vertical 6, horizonal 2, opacity 31, blur 4.
23. merge visible.
24. copy and paste your WastedTime wordart. Resize if nesseccary.
25. Add a new layer and add your mask. Merge group. then merge visible.
26. Add your copyright & name and whala! You are now finished!





2 comments:
Hi hun excellent blog but i hate to have to tell you steps 1-6 are missing on your tut
dont hate me lololol
love ya
Lil
Thanks Miggins for pointing that out, now i'll have to rewrite it, i dunno what happened to them.
Post a Comment