Showing posts with label Templates. Show all posts

Tuesday, September 8, 2009

Another New Template

Hello Again, I have been inspired to create yet another template.

One of the entries in my Stalker Contest sent me a stalker chat box created with Gorjuss Girls.I thought it was just adorable! So, Rachel, you have inspired me to create a template for your Gorjuss Girls..... This one's for you.

Download PSD HERE
Download PSP HERE

2 New Templates


Yep those creative juices sure are flowing... here are a couple more templates for you.

Feed Your Addiction PSD
Feed Your Addiction PSP

Super Star PSD
Super Star PSP

Friday, September 4, 2009

New Tutorial "Unleash Me" & Freebie Template

As promised here is my new quick tut and template...


Unleash Me

Written by me as we speak lol... on September 4th of 2009
any similarities to any other tutorial is just plain crazy.

Artwork ©Ismael Rac www.xeracx.com
Use with license from: ArtisticMinds, Inc
Created With: Paintshop Pro X


Supplies:

Download template HERE
(Included in template: is everything seen except the tube of course and whats mentioned below.)

1 brush/wordart of choice

2 papers of choice (Hearts in frames are included in template)
font of choice
2 or more tubes created by the same artist
(I used Capricorn and Pretty Tracy)


No outside filters needed.

Let's Begin!

Open your template in PSP.
Close out my blog info.
Get out your tube choice, and 2 paper choices.


Activate layer 12 of the template and using your magic wand click on layer 12 and go to selections > modify expand > by 1. Copy your 1st paper and then paste into that selection by holding ctlr + shift + L on your keyboard.
Next go to selections>select none.

Repeat the above step for layer 11 of the template.

Next activate layer 10 and colorize it by holding down shift + L on your keyboard and select a color of choice. Next lets add some texture to layer 10 by going to Effects> Texture Effects> Blinds now apply following settings: width 3, color black, opacity 100, horizontal unchecked, light from top left checked.
Repeat the above steps for layer 1 also.

Next we're on to layer 9 and your brush/wordart. Colorize this layer, add a paper here, use your brushes, texturize, add a little bling. I pretty much left this blank purposely for you to add your own touches here.

Next on to the frames (layers 2, 4, 6). Now here you can play too. On my tag i just made all the frames black. To do this hit shift + H at the same time and lower your saturation to 0 and you lightness to -100. Free free to add some color or texture to these if you wish.

Now the frame backgrounds (layers 3, 5, 7 ) now here i have included the hearts, but if you wish you may choose something different. I chose to colorize my hearts. To do this hold shift + L on your keyboard and pick an appropriate color.

Now Open your girls.
Well be working with the one in the picture frames. Duplicate her 3 ti
mes, arrange and
resize all 3 so she fits nicely into each of the frames
(i don't want to give exacts here because not all tubes are the same dimensions)
Crop out all of the excess hanging outside the frame by clicking on each frame layer and with your magic wand click inside the frame, then go to selections> Modify> expand by 2. Then click on the girl with that appropriate frame and hold down ctlr + shift + I on your keyboard to invert the selection then press ctlr + X to remove the excess.
Do this for all 3 girls.

Next add your words.
I added the phrase "Unleash Your Inner Stalker". Feel free to use it.
Also add your name and your copyright information here.

Now that we have created your tag. It's time to add dropshadows to each of the layers.
You may choose your own settings here as well, or use the same ones i did.
My settings: Vertical +4, Horizonal -2, Opacity 60, Blur 10. Add this to all layers except your copyright layer.

Merge all visible and add a mask of choice if wanted.


Waaaahlaaa! you have now finished! Congratulations!


Below is one more example of what can be done with template:


Wednesday, July 8, 2009

New Tutorial


(click to view full photo)

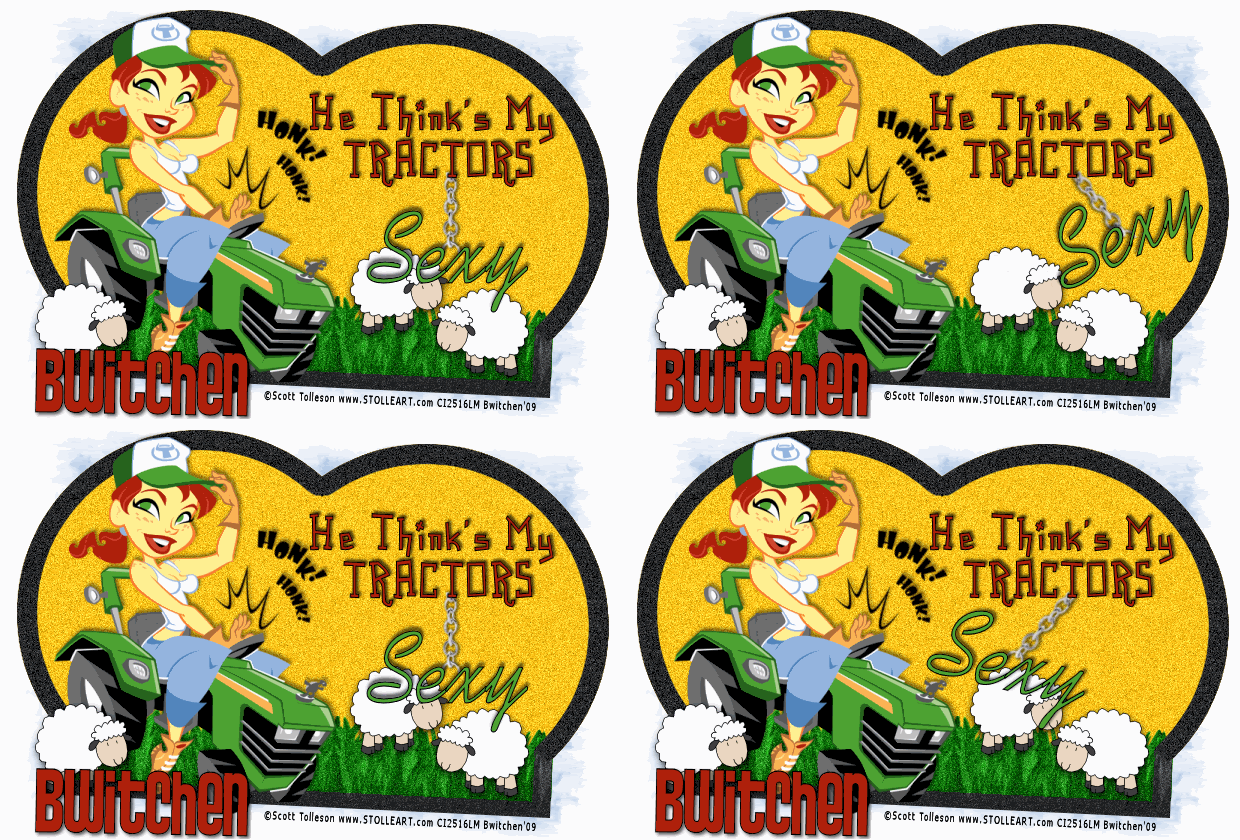
He Thinks My Tractors Sexy
This tutorial was written by me on July 8,2009
any resemblance to any other tutorial is coincidental.


Supplies:

Paintshop Pro. I used PSP X & Animation Shop

A prior knowledge base for each of these programs helpful.

Tube Of Choice: I used Scott Tolleson's Tractor Girl
Purchased at CILM and used with a license.
Scott is no longer a member of CILM.
Please see his website for information on his tubes.
www.stolleart.com

My Template & Supplies found HERE
(includes template, sheep, grass, chain, wordart)

Font Of Choice


Let's Begin:

1. Open up all supplies in psp.

2. we will be using template: Bwitchen_Template_SexyTractor
this is pre-sized for a nice sized tag of about 600 x 400 so no
resizing should be needed.

3. erase my information from the template.

4. Click on the black section of the template using your magic wand.

5. now right click on the layers pallet and promote selection to a layer.
(Be sure to keep your marching ants on for the next few steps.)

6. next adjust the hue of the black layer to a lighter gray by clicking shift+H on your keyboard.

7. Add your color to your background I used html #fde01d
(feel free to substitute a color for a background of choice, if you do this skip step 8)

8. now add some noise by going to adjust> add/remove noise> add noise> settings: Gaussian & Monochrome checked 20%

9. now invert your selection and repeat step 8 same settings only this time add 50% noise.

10. now we will darken the frame by clicking shift+H on your keyboard, settings satuation zero lightness -44.

11. go to selections> select none

12. now go to the supplies, and cut out the grass and paste it as a new layer.

13. next press K on your keyboard and rotate the grass so it is even with the frame if it is hanging over that's okay, we will be "mowing" it in the next step.

14. click on your 2nd layer (the yellow background) selections> select all> float> defloat then click on the grass layer and choose selections>invert
and "Mow" or cut your grass.

15. now add your tube. Place it to the left of the tag. add a drop shadow of choice i used -4, 2, 14, 5

16. Now add your tube. I used Scott Tolleson's Tractor Girl. Place it just to the left of the tag, and add a dropshadow -4, 2, 14, 5

17. Add your sheep. Use the ones with the eyes open. Place them where ever you like, and add a drop shadow of -4, 2, 14, 5

18. Add your Tractor word art at the top of the tag, and add a drop shadow to it also of -4, 2, 14, 5

19. Merge all layers, and duplicate 3 times.

20. Go back to your sheep and use your dropper tool to extract the face color,
and "paint" your eyes so they are not visible, on one sheep.

21. Repeat step 20 for each layer, choosing a different sheep each layer.

22. Now grab your swinging sexy wordart. Place it just under the 2nd "T" in tractor, and duplicate twice.

23. Hide your 1st copy of the swinging sexy layer. and choose the 2nd one, now press "k" on your keyboard and rotate it to the right just a little. reopen the 1st copy and move below the 2nd copy. Click the 2nd copy and move it over so that the top of the chain on the 2nd copy lines up with the one on the 1st copy. Hide both copies..

24.
Unhide your 3rd copy of the swinging sexy layer. now press "k" on your keyboard and rotate it to the left just a little. Unhide the 1st copy and move the 3rd copy below the 1st copy. Click the 3rd copy and move it over so that the top of the chain on the 3rd copy lines up with the one on the 1st copy.

Now you should have... 3 copies of the sexy wordart, and 3 tag copies.

25. Unhide & merge one tag & one sexy word art together. Repeat for each wordart/tag.

26. Add your copyrights. Duplicate 3 times. Merge a copy of this on to all 3 tags.

ALMOST FINISHED Time To Open ANIMATION SHOP

27. Copy each tag layer over to animation shop, in this order...
sexy swinging to the left, then center, then right. Go back to PSP and copy one more copy of the centered sexy, and then go back to animation shop and paste after the last layer.

28. Click on copy 1 of the tag and click on it then preess ctlr + A on your keyboard (this while activate all layers)

29. Go to Animation> frame properties and use a setting of 26.

30. Now view your animation by clicking view>animation. Once you are satisfied,
you will n ow be ready to add your name to the tag.

31. Go back to PSP and create your name using your choice of font. Be sure to add a drop shadow of -4, 2, 14, 5.

32. Copy this layer over to animation shop and paste as a new animation.

33. Go to edit> propagate paste and add your name to the animation & save.

All finished! Now your have created your very own He Think's My Tractors Sexy animation.

Monday, May 11, 2009

2 New Templates


Two new templates, a book & bird houses.
(Click on image to enlarge in a new window, then right click and save as PNG.)

Monday, April 6, 2009

Freebie Easy Tut &Template: Purse


One last freebie for today at least...


Purse Template / Quick Tut

Tube information :
©Keith Garvey www.garvgraphx.com
used with license purchased from
myPSPtubes.com

You too can create the above tag using my newest template just like a pro.
You can do just as i did and color your new purse, or spiff it up by using a pattern.
It is easy to do just use your magic wand & click on each color piece & promote to a new layer, then either color, sculpt, or add a pattern. It's that easy.

Feel free to download below
(included in this zip: purse template, greyscale bow, greyscale doodle, & wordart.)

DOWNLOAD HERE


Sunday, April 5, 2009

More Freebie Templates


Well, i am back with more templates
so you too can create a wonderful tag like mine.

Living Room Templates

In my tag i used the
nightstand, chair, telephone, & picture frame templates

Feel free to download them from the zips below:
(click on the word that represents which item you want)

Chair Telephone Picture-Frame Nightstand

Enjoy! I shall be back with more!


Freebie Templates


Well, i have been working hard to get out some new freebie goodies for everyone.
Here is what i came up with...

Bedroom Templates

You too can create the above tag with this set.
In my tag used the bed, nightstand & rug templates.

Feel free to download them from the zips below:
(just click on each word that represents the item you want)
Bed Nightstand Rug

Enjoy! I have many more goodies to post today, i hope everyone like them.