Saturday, July 25, 2009

New Animated Tutorial: Underwater Beauty


(click image to view full image)

This tutorial was written by me on
July 25,2009
any similarities to any other tutorial is completely coincidental.

Was written in Paintshop Pro X & Animationshop
Prior knowledge of these programs are helpful.

Supplies:

TUBE OF CHOICE
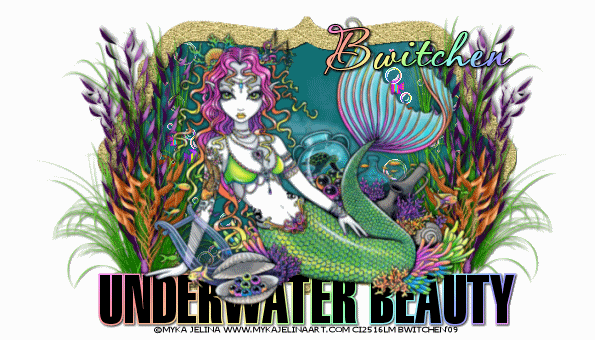
I am using the artwork of Myka Jelina
and it has been purchased & used with a license from CILM

My Supplies Here

Included in my supplies:
Template by me
Fish & Bubble animation gif's
Wordart By Me
Gold Fill Sand By Me
Seaweed & Seagrass may be downloaded from OutlawByDesign

Not included: Water background of choice (i created my own)


Let's Begin

Open all supplies.

Open a new image 700 by 400.
Flood fill with white.
Copy & paste my template.
Click on the gray area using the magic wand, expand by one & promote section to layer.
Open your background choice, and paste into selection.

Selections>select none

Back on the template layer, using your magic wand, click on the outside of the template where there is no image. Invert, press shift & H on your keyboard, and move the slider either up to white or down to black, to make the template all one color then flood fill with the gold fill sand.

Selections>Select none

Copy and paste your sea grass & seaweed tubes. Recolor & resize to fit appropriately.
First add your grass to the left, add a drop shadow of 1, 1, 86, 3
Repeat again for both seaweed.
Place the larger seaweed on top of the grass, then add the smaller on top of that.
Merge the grass and seaweeds together. Duplicate & mirror.

Add your wordart. Placing it so it just covers the seaweed/grass, and the edge of your "aquarium" at the bottom. Add a drop shadow of 1, 1, 86, 3
Add you copyright info here.

Add your tube just on top of the word art add a drop shadow of 1, 1, 86, 10

Close out the following layers the white background & the two pieces of template, so that you are left with the tube/seaweed/sea grass/word art/copyright info. Merge all of these layers together.

You should have 4 layers so far:

The tube/seaweeds/word art
template layer 1
template layer 2
white background

Animation Shop

Copy and paste each individual layer over to animation shop as a new animation for each.
Duplicate both template layers 1 and 2 and the white background until you have a total of 15.

Now select all on template 2 and the white background. Now
drag template 2 over to the white background and place in the center.


Open your fish & bubbles

Now click on the 1st box of each of the fish/bubbles/and template 1 choose select all

On your template layer 1 add your fish and bubbles as you wish, by clicking and holding, then dragging to the template 1 layer.
Be sure your bubbles rise to the top but not over the edge.
To add more of each, just click on that item and undo, then repeat each step.

Set your frame speed at 20.

Click on your tube/word art/seaweed/copyright info then go to edit and choose propagate paste and drag that layer over to your underwater scene.

View your Animation here

Once you are satisfied, add your name, and save!


Wednesday, July 22, 2009

Otakon '09 Baltimore Convention Center Artists

While visiting Otakon this year, i must say creatively speaking it was a fantastic way to spend the weekend with my kids. Not only did they enjoy themselves, i did also. I must say though my favorite part was Artist Alley. As i made my way through all of the creatures, elves, gundams, and Naruto fans i was in awe and wonder of all the wonderfully created art that was in front of me.

I managed to pick up quite a haul in Artist Alley, not only of artwork from various artists, i also purchased a commission of my daughter, and a book from Deviant Art called "Mugeno".

All in all it was an awesome experience and i would like to the time to thank all of the artist that were there offering up their creations at such small prices.

Here is where i will be listing all of the artists i found at the convention... or at least those that had business cards or gave me their sites....

It's really worth checking out all the wonderful art by these artists!

Deathful Studios art of Iris Chen
The Alatus Institute
All The Small Things Kasandra Callalily
Paint Pixel Productions illustrations by Annie Hill
Kathemo Kathemo/B-Kitten
Aborted Creativity (includes the below 4 artists also)
Richard Tang
Phillip Kwok
Matt Bellamy
Eli Mintzer
Shadow Child Studios Paul Jacouino
Jessica Regenbrecht Comics and Illustration
Danielle Dernoga Digital Artist
Hans Tseng Illustrator and Comic Artist
Gina Tingas Freelance Artist
Mellolover
Vicki
Sin Comix Tasha & Ivory M. Cartoonists/illustrators/designers
Allison Strejlau (deviant) (blogspot)
Allison Henderson Illustrator/Artist
Dan Howard (deviantart)
Schin Hern Loong Illustation
MIYA from SUBTEXT Studio
Fake Radish Studios Jesse Davis Illustrator/Art Instructor (deviantart)
Ninja Consultant a podcast about anime, manga, and ninjas
Del Borovic freelance/illustration/comics/design (deviantart)
Video Game Zombies
Jonathan Hoffman (deviantart)
Raydiant by Raymund Anlocotan Freelance Illustrator
Sleepar
Alyssa Few Digital Art & Illustrator
Kyocs- freelance Artist
Emily Hu Artist (deviantart)
William "s2k/gts" Ray Artist (deviantart)
Ashley Mckenzie Illustration & Graphic Design (deviantart)
Kuroi Tenshi Freelance Artist/ Manga Artist (deviantart)
The Devils Panties Online Comic Strip It's Not Satanic Porn Honest!
Nightambre Studios Artist/commissions (deviantart)
Alexandria Bustion Illustration/animation/vinyl toys (blogspot) (deviantart)
Yamiko Michi Artist/traditional/commissions (deviantart)
Kathie Soto (deviantart 1) (deviantart 2)
Kevin Yan Freelance Fantasy Art (blogspot) (deviantart)
Jinny Liang Freelance artist/commissions (blogspot) (deviantart)


I will be adding many more to this list as i have hundreds of cards.
Please bare with me and keep checking back for updates.


Monday, July 20, 2009

Otakon 09 Baltimore's 16th Annual Anime Convention


This year i took my son & daughter to Baltimore Maryland for the 16th annual Otakon Anime Convention.

Here is a slide show of over 190 photo's i took.
To preview more, stop by my photobucket:
http://s169.photobucket.com/albums/u235/BwitchenBabe/Otakon%2009/Otakon%20Day%201%20July%2017%202009/

Please if you see yourself in any of these photo's leave me a note or email me at: Bwitchen@gmail.com so i can add your name to the photo.

Monday, July 13, 2009

New Word Art


Well, i have been trying to catch up lately with my creative side.
Here is a new wordart i just created.

(click the pic to enlarge, then right click to save and save as...)

Wednesday, July 8, 2009

New Tutorial


(click to view full photo)

He Thinks My Tractors Sexy
This tutorial was written by me on July 8,2009
any resemblance to any other tutorial is coincidental.


Supplies:

Paintshop Pro. I used PSP X & Animation Shop

A prior knowledge base for each of these programs helpful.

Tube Of Choice: I used Scott Tolleson's Tractor Girl
Purchased at CILM and used with a license.
Scott is no longer a member of CILM.
Please see his website for information on his tubes.
www.stolleart.com

My Template & Supplies found HERE
(includes template, sheep, grass, chain, wordart)

Font Of Choice


Let's Begin:

1. Open up all supplies in psp.

2. we will be using template: Bwitchen_Template_SexyTractor
this is pre-sized for a nice sized tag of about 600 x 400 so no
resizing should be needed.

3. erase my information from the template.

4. Click on the black section of the template using your magic wand.

5. now right click on the layers pallet and promote selection to a layer.
(Be sure to keep your marching ants on for the next few steps.)

6. next adjust the hue of the black layer to a lighter gray by clicking shift+H on your keyboard.

7. Add your color to your background I used html #fde01d
(feel free to substitute a color for a background of choice, if you do this skip step 8)

8. now add some noise by going to adjust> add/remove noise> add noise> settings: Gaussian & Monochrome checked 20%

9. now invert your selection and repeat step 8 same settings only this time add 50% noise.

10. now we will darken the frame by clicking shift+H on your keyboard, settings satuation zero lightness -44.

11. go to selections> select none

12. now go to the supplies, and cut out the grass and paste it as a new layer.

13. next press K on your keyboard and rotate the grass so it is even with the frame if it is hanging over that's okay, we will be "mowing" it in the next step.

14. click on your 2nd layer (the yellow background) selections> select all> float> defloat then click on the grass layer and choose selections>invert
and "Mow" or cut your grass.

15. now add your tube. Place it to the left of the tag. add a drop shadow of choice i used -4, 2, 14, 5

16. Now add your tube. I used Scott Tolleson's Tractor Girl. Place it just to the left of the tag, and add a dropshadow -4, 2, 14, 5

17. Add your sheep. Use the ones with the eyes open. Place them where ever you like, and add a drop shadow of -4, 2, 14, 5

18. Add your Tractor word art at the top of the tag, and add a drop shadow to it also of -4, 2, 14, 5

19. Merge all layers, and duplicate 3 times.

20. Go back to your sheep and use your dropper tool to extract the face color,
and "paint" your eyes so they are not visible, on one sheep.

21. Repeat step 20 for each layer, choosing a different sheep each layer.

22. Now grab your swinging sexy wordart. Place it just under the 2nd "T" in tractor, and duplicate twice.

23. Hide your 1st copy of the swinging sexy layer. and choose the 2nd one, now press "k" on your keyboard and rotate it to the right just a little. reopen the 1st copy and move below the 2nd copy. Click the 2nd copy and move it over so that the top of the chain on the 2nd copy lines up with the one on the 1st copy. Hide both copies..

24.
Unhide your 3rd copy of the swinging sexy layer. now press "k" on your keyboard and rotate it to the left just a little. Unhide the 1st copy and move the 3rd copy below the 1st copy. Click the 3rd copy and move it over so that the top of the chain on the 3rd copy lines up with the one on the 1st copy.

Now you should have... 3 copies of the sexy wordart, and 3 tag copies.

25. Unhide & merge one tag & one sexy word art together. Repeat for each wordart/tag.

26. Add your copyrights. Duplicate 3 times. Merge a copy of this on to all 3 tags.

ALMOST FINISHED Time To Open ANIMATION SHOP

27. Copy each tag layer over to animation shop, in this order...
sexy swinging to the left, then center, then right. Go back to PSP and copy one more copy of the centered sexy, and then go back to animation shop and paste after the last layer.

28. Click on copy 1 of the tag and click on it then preess ctlr + A on your keyboard (this while activate all layers)

29. Go to Animation> frame properties and use a setting of 26.

30. Now view your animation by clicking view>animation. Once you are satisfied,
you will n ow be ready to add your name to the tag.

31. Go back to PSP and create your name using your choice of font. Be sure to add a drop shadow of -4, 2, 14, 5.

32. Copy this layer over to animation shop and paste as a new animation.

33. Go to edit> propagate paste and add your name to the animation & save.

All finished! Now your have created your very own He Think's My Tractors Sexy animation.